使用hexo快速进行博客搭建
使用hexo快速进行博客搭建
之前用wordpress搭建的博客需要折腾的东西太多,编辑器支持也不太好,没有Notion里记笔记来的方便(该说写个笔记两头传本来就麻烦),所以这次用hexo来搭建看看。
部署选择了一键同步生成的网站内容到github repo上,使用pages来进行网站部署,markdown源文件再自己使用github来同步。
这篇文章主要记录一下搭建网站的过程,还有给搭建的时候看的几个文档链接留个档。
hexo官方文档
- https://hexo.io/docs/
- https://hexo.io/zh-cn/docs/ 中文
hexo 常用命令
hexo new [layout] <title>
创建新文章,使用默认的layout:post
hexo generate
一般会使用缩写hexo g,并且加上-d参数来一键部署到远端(我目前是部署到了github上),也可以加上-w来观察文件变化,或是加上-f来重新生成
hexo server
虽然是部署到远端上,但是也可以在真正提交前先在本地简单地生成部署一下,看下文章显示是否有问题,或者用这个命令来协助debug(带上--log,以及--debug参数)
加上-p来指定部署的端口,以防在特定环境下收到安全组影响
hexo deploy
部署到远端,这个命令也可以加上-g从而在部署之前生成
hexo clean
清除本地生成文件,遇到奇怪显示问题可以考虑先执行一下,再重新generate
部署相关(github-pages)
- https://segmentfault.com/a/1190000017986794 一键部署
- https://zhuanlan.zhihu.com/p/26625249 自定义域名步骤参考,免去之前使用wordpress自己部署网站时解析的麻烦
- https://docs.github.com/en/pages/configuring-a-custom-domain-for-your-github-pages-site/about-custom-domains-and-github-pages
自定义域名在参考了上述链接后做了一点尝试:
首先域名还是使用的之前搭建wordpress用的threegates.net
这里开始需要做的是将域名重定向到github-pages,所以实际上需要参考的比较权威的文档是上面的链接3
github pages建议的是使用www域,说明了使用www域使pages也会为你进行apex domain(即不带www的threegates.net)的重定向。
We recommend always using a
wwwsubdomain, even if you also use an apex domain. When you create a new site with an apex domain, we automatically attempt to secure thewwwsubdomain for use when serving your site's content. If you configure awwwsubdomain, we automatically attempt to secure the associated apex domain.参考“Managing a custom domain for your GitHub Pages site”,首先在gtihub repo的settings->pages目录下配置Custom Domain,这里使用
www.threegates.net在阿里云的DNS解析中配置,这里应该将
www.threegates.net使用CNAME形式解析到我的kalulas.github.io,且通过dig工具和后续文档可以得知,如果配置了threegates.net到github pages提供的四个DNS(见下文),github pages会帮你重定向到网页内容,而www.threegates.net配置到kalulas.github.io之后,后面其实也是解析到github.pages的DNSdig命令解析结果如下(threegates.net的解析情况也一样):
$ dig kalulas.github.io +nostats +nocomments +nocmd
; <<>> DiG 9.11.4-P2-RedHat-9.11.4-26.P2.el7_9.8 <<>> kalulas.github.io +nostats +nocomments +nocmd
;; global options: +cmd
;kalulas.github.io.             IN      A
kalulas.github.io.      3600    IN      A       185.199.109.153
kalulas.github.io.      3600    IN      A       185.199.111.153
kalulas.github.io.      3600    IN      A       185.199.110.153
kalulas.github.io.      3600    IN      A       185.199.108.153
$ dig www.threegates.net +nostats +nocomment ; <<>> DiG 9.11.4-P2-RedHat-9.11.4-26.P2.el7_9.8 <<>> www.threegates.net +nostats +nocomment ;; global options: +cmd ;www.threegates.net. IN A www.threegates.net. 600 IN CNAME kalulas.github.io. kalulas.github.io. 3600 IN A 185.199.109.153 kalulas.github.io. 3600 IN A 185.199.111.153 kalulas.github.io. 3600 IN A 185.199.110.153 kalulas.github.io. 3600 IN A 185.199.108.153最后,在第4步中修改Custom Domain会添加一个文件CNAME到repo的根目录下,但是由于使用了一键部署,实际上同步的目录是~/.../your_site/.deploy_git,可以在这个目录下同步,但是这个目录是由~/.../your_site/source生成而来的,所以得在source下也创建一个CNAME文件,内容就用github为你生成的
www.threegates.net即可最后,文档提示了可以enforce HTTPS,这个在后续也加上了,工作正常
网站主题
当前维护中的next主题传送门:
- 官方文档:https://theme-next.js.org/docs/
- github:https://github.com/next-theme/hexo-theme-next
当前threegates的hexo是使用npm的方式安装主题并更新的,参考
$ cd hexo-site
$ npm install hexo-theme-next
一次在给博客的本地搜索功能debug的时候发现了现在next其实同时存在着多个github项目,和这些项目中指向的多个文档,导致容易阅读到一些与当前版本的不匹配内容...这边还是留意下,以上文中提供的两个链接为参考(当前next版本v8.14.1)。

顺带一提,我发现的停止维护项目有:
- theme-next/hexo-theme-next
注意这里用户名是
theme-next而不是上文的next-theme...这个仓库release停留在了v7.8.0 - iissnan/hexo-theme-next 这个仓库中文内容很多,但是也已经停止维护,release停留在v5.1.4
NexT 主题配置
以前我们会将主题的配置内容放在
themes/[theme_name]/_config.yml,又或者放在
node_modules/[theme_module_name]/_config.yml
中,但是这样在升级主题时,我们的配置内容会被覆盖。实际上今年把博客的部署路径从
alicloud 挪到我个人笔记本的尝试中,就遇到了一些相关的问题。
从 hexo 5.0 起,hexo 就提供了将主题配置也放在网站/博客根目录的选择,可以参考这篇文章。现在,我们可以选择在根目录下创建一个 _config.next.yml ,并将原配置内容复制到这个新的配置文件中即可。
当然 hexo 还提供了其他方案,如在 _config.yml 下新增 theme_config 项,在这里为了更清晰的版本历史,我们选择了独立 yml 文件的方式。
当 hexo 在生成网站静态文件时,这些配置项会被合并。优先级顺序为:
- 网站根目录 _config.yml 中的 theme_config 项
- 网站根目录下独立的 _config.[theme].yml 配置文件
- themes 目录下的配置文件
调整代码配色主题
threegates 使用的代码配色/高亮引擎是 prism,在 hexo 配置文件 _config.yml 中有如下配置
# hexo 7.0 起需要指定 highlighter
syntax_highlighter: prismjs
# highlight 部分也在这里,不同不重要
prismjs:
  preprocess: false
  line_number: true
  line_threshold: 0 # 可以配置超过多少行才显示行号
  tab_replace: '    '
在主题配置文件 _config.next.yml 有如下配置
codeblock:
  # Code Highlight theme
  # All available themes: https://theme-next.js.org/highlight/
  # theme 部分配置可以无视
  # ...
  # prism 块下设置不同颜色主题下的代码配色方案
  prism:
    light: prism-tomorrow
    dark: prism-tomorrow
  # Add copy button on codeblock
  copy_button:
    enable: true
    # Available values: default | flat | mac
    style: default
  # Fold code block
  # NexT 新版本提供的折叠过长代码功能,旧版本配置会在这里因为缺少配置触发一个 Error...
  fold:
    enable: true
height: 500如果需要预览配色方案的效果,可以前往这个网站
调整内联代码布局
由于内联代码的 style 为
overflow-wrap: break-word,生成出的博客内容必须保证内联代码块内容在同一行,从而导致部分行的中文内容无法填充完整,且间隔被均等分,看着特别不舒服。
目前的修改方式是手动调整了 next 主题的 css 生成规则文件 _mixins.styl,可能会由于后续的 next 主题更新被覆盖,需要注意。
// node_nodules/hexo-theme-next/source/css/_mixins.styl
word-wrap() {
    // overflow-wrap: break-word; // <- 移除
    word-break: break-all; // <- 新增
}
样式(layout)自定义
阅读了hexo和NEXT的模板相关文章,简单看了下关联的njx,ejs文件,想通过is_post()或者is_home()的helper方法实现一下仅在文章页显示阅读进度条的效果,但是似乎返回结果不正确,现在在next的github页提了issue还在等回复。
njx中的语法与ejs不完全相同,简单参考了非官方文档:
- https://carrion.cc/20210201/85bc1840d3ea.html 核对了一下njk中的helper语法
图片墙
选用了hexo-light-gallery插件,传送门
https://github.com/lzane/hexo-light-gallery
按照教程安装了hexo-light-gallery,对node_modules/hexo-light-gallery/src/renderer.js
做了一点修改
// node_modules/hexo-light-gallery/src/renderer.js
function addTag(data){
    var config = this.config.lightgallery;
    if(!config){
        return;
    }

    // add js
    // 这里本来 '>' 在 '"' 前面,会造成结构破坏
    data.content = '<div class=".article-gallery">'+data.content+'</div>';
    data.content+='<script src="'+config.js+'"></script>';

    // add css
    var css = '<link rel="stylesheet" type="text/css" href="'+config.css+'" />';
    data.content = css + data.content;

    // add plugins
    var plugins = Object.keys(config.plugins);
    for (var plugin of plugins){
        var jsTag = '<script src="'+config.plugins[plugin]+'"></script>';
        data.content += jsTag;
    }
}

// ...
function render(data){
    if (ignore(data)){
        return;
    }
    // 如果找不到图片标签,就不执行下面的代码,就不会在不需要的地方增加多余内容
    if (!imgRgr.exec(data.content)){
        return;
    }

    wrapImage.call(this,data);
    addTag.call(this,data);
    addRunnableTag.call(this,data);
};
在lightgallery提供的插件(插件的插件...)中补充了三个插件:
- lg-thumbnail: 提供图片的缩略图
- lg-zoom: 提供图片缩放功能
- lg-fullscreen: 提供图片全屏预览功能
三个插件都通过npm下载了.min.js文件,放置于/source/js/下,现在的_config.yml如下
# Plugin: lightgallery https://github.com/lzane/hexo-light-gallery
lightgallery:
# if you don't specify the css or js source, the default cdn will be used.
# css: # css source url
# js: #js source url
# sorry that I can not find any cdn hosting following plugins,
# please self-host the plugin js and add url here
  plugins:
    lg-thumbnail: /js/lg-thumbnail.min.js
    lg-zoom: /js/lg-zoom.min.js
#   lg-autoplay:
    lg-fullscreen: /js/lg-fullscreen.min.js
#   lg-pager:
基于模板进行html生成
很在意html中的一些js代码资源标签<script>是怎么在生成时加上的,如图上的这种

要知道它的生成机制才方便做一些js代码上传,还有cdn上的资源放到本地这样的操作,进行了一些排查大致定位下下面这些信息:
- index.njk文件里利用了
next_js()这个方法来加载next提供的静态js文件,如 comments.js,utils.js 等等
// hexo-site-home/node_modules/hexo-theme-next/layout/_scripts/index.njk

{%- include 'vendors.njk' -%}

{{- next_js('comments.js') }}

{{- next_js('utils.js') }}
{%- if theme.motion.enable %}
  {{- next_js('motion.js') }}
{%- endif %}

{%- if theme.scheme === 'Muse' or theme.scheme === 'Mist' %}
  {{- next_js('schemes/muse.js') }}
{%- endif %}

{{- next_js('next-boot.js') }}
{%- if theme.bookmark.enable %}
  {{- next_js('bookmark.js') }}
{%- endif %}
{%- if theme.pjax %}
  {{- next_js('pjax.js') }}
{%- endif %}
而在上面代码块的第一行看到了{%- include 'vendors.njk' -%},找到对应的文件vendors.njk下可以看到
// hexo-site-home/node_modules/hexo-theme-next/layout/_scripts/vendors.njk

{%- if theme.canvas_ribbon.enable %}
  <script size="{{ theme.canvas_ribbon.size }}" alpha="{{ theme.canvas_ribbon.alpha }}" zIndex="{{ theme.canvas_ribbon.zIndex }}" src="{{ theme.vendors.canvas_ribbon.url     }}"></script>
{%- endif %}

{%- for name in js_vendors() %}
  {{ next_vendors(name) }}
{%- endfor %}
{%- for name in js_vendors() %}遍历的就是js_vendors()方法返回的所有js资源标识符
js_vendors()这个方法是在next-vendors.js中注册的,像prism-core的这些cdn上获取的js资源,先通过配置来决定是否push到返回的vendors列表中,逻辑如下
// hexo-site-home/node_modules/hexo-theme-next/scripts/helpers/next-vendors.js

hexo.extend.helper.register('js_vendors', function() {
  const { config, theme } = this;
  const vendors = ['anime'];
  if (config.prismjs.enable && !config.prismjs.preprocess) {
    vendors.push('prism', 'prism_autoloader');
   if (config.prismjs.line_number) {
     vendors.push('prism_line_numbers');
    }
  }
  if (theme.pjax) {
    vendors.push('pjax');
  }
  if (theme.fancybox) {
    vendors.push('jquery', 'fancybox_js');
  }
  if (theme.mediumzoom) {
    vendors.push('mediumzoom');
  }
  if (theme.lazyload) {
    vendors.push('lazyload');
  }
  if (theme.pangu) {
    vendors.push('pangu');
  }
  return vendors;
});
从上文可以看到vendors.njk会遍历js_vendors列表,并且用拿到的每一个vendor_name去调用方法next_vendors,而这个方法就是在engine.js中注册的。
next_vendors的逻辑就是查找vendor的相应配置,vendors字段中的内容是从主题目录下的_vendors.yml这个yaml配置文件中解析出来的。
// hexo-site-home/node_modules/hexo-theme-next/scripts/helpers/engine.js
// ...
hexo.extend.helper.register('next_vendors', function(name) {
  const { url, integrity } = this.theme.vendors[name];
  const type = url.endsWith('css') ? 'css' : 'js';
  if (type === 'css') {
    if (integrity) return `<link rel="stylesheet" href="${url}" integrity="${integrity}" crossorigin="anonymous">`;
    return `<link rel="stylesheet" href="${url}">`;
  }
  if (integrity) return `<script src="${url}" integrity="${integrity}" crossorigin="anonymous"></script>`;
  return `<script src="${url}"></script>`;
});
- 所以如果想加一个js文件资源引用,可以考虑作为一个静态资源加入项目,并在index.njk就利用
next_js()加载;也可以考虑在next-vendors.js代码中将这个js文件的标识符push到vendors里面,然后再到theme(也就是我这里使用的NexT)的_vendors.yml文件里面去注册这个标识符对应的文件路径,版本等,这样想要通过cdn加载js文件也方便。 - 实际上针对上述方法二,这个_vendors.yml是可以使用这个项目 next-theme-plugins 生成的,我自己试过也成功了。不过对于一些小改动(比如为prism添加一个prism-download-button.js),自己做下_vendors.yml的修改,加入一个条目也是很简单的,不需要安装那么多依赖项。
资源文件夹
网站需要显示一些像网站图标和用户画像,还有文章中的截图这样的资源,参考hexo文档,最后采用的方式是将配置项post_asset_folder设置为true,这会让hexo在新建post时为这个post新建一个同名资源文件夹。然后使用hexo-renderer-marked
3.1.0
的特性,在文章中直接使用markdown图片格式,图片链接直接填写图片文件名,hexo会将资源请求重定向到post的同名资源文件夹中。
值得一提的是也可以在其他post中使用相对路径来索引到这些资源,为post之间共享资源提供了思路。
_config.yml配置形式如下:
post_asset_folder: true
marked:
  prependRoot: true
  postAsset: true
hexo以及next的更新
从各自的官方文档或者npm都能查看到当前的最新版本,据说NexT是每个月都会发布新版本的,遇到问题都可以留意一下是不是最新版本(当然也要做好回退的准备,更新hexo和next时都记得备份_config.yml)。
贴一下npm对应package的链接:
- hexo
npm package
- hexo-theme-next
npm package
执行npm命令来检查packages是否有新版本:
$ cd hexo-site
$ npm outdated使用npm进行package更新(当然,hexo本身也是一个package),并使用参数--save将改动保存到package.json:
$ cd hexo-site
$ npm update <package-name> --save
或者使用npm-check-updates,来将package.json更新到最新版本,再一次性全部安装最新版
$ npm i npm-check-updates -g # 如果你没有安装过npm-check-updates
$ ncu # 检查版本更新,类似npm outdated,ncu是npm-check-updates的别名
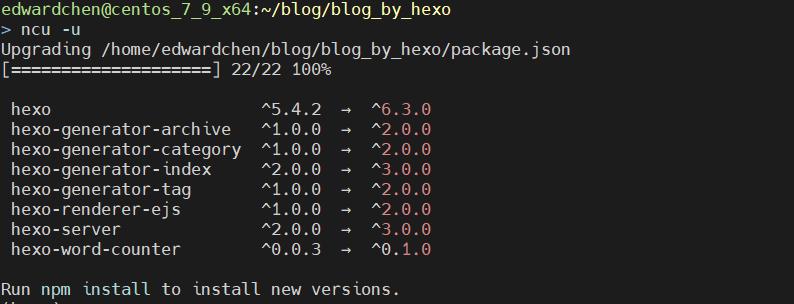
$ ncu -u # 更新package.json
$ ncu package_name [-u] # 仅检查单个/多个包的更新,添加参数来应用到 package.json
$ npm install # npm按照更新后的package.json进行安装
输出如下:

